


Photoshop Tips for T Shirt Designers
For all of you humans out there designing a shirt in Photoshop there are some techniques and tricks that can help you work more efficiently. Working in Photoshop is a never ending learning process list below are a few tricks to help streamline your workflow. We’re going to go over some techniques that will help that will help you design more efficiently and better in Photoshop. This will be a 3 part series in using shortcuts and valuable time saving tips designing t shirts and other artworks in Photoshop.
When designing a t shirt or anything with multiple layers there are some simple keyboard strokes that cut down on clicking and moving the mouse all over the screen. Place the left hand on the keyboard around the control and command keys then check out this list of shortcuts. A few tips here and there that can greatly increase your efficiency as a t shirt designer.
Increasing your Efficency in Photoshop
These shortcuts will be done using “Cmd” on a Mac, so PC users use the “Ctrl” key . These are predetermined keystrokes are programed in Photoshop to help increase efficency when working on a new t shirt design. You can also create your own shortcuts or make changes to the keys that certain commands do.
Creating Your Own Shortcut - Build your own shortcuts in Photoshop to help you increase your efficiency.
Build Own Shortcut: Ctrl + Alt + Shift +K or Edit to Keyboard Shortcuts. This is were you can manage all your keyboard shortcuts, and even make your own.
Top Keyboard Shortcuts for Designing a T Shirt and other Graphics
Create New Layer - When working in Photoshop adding layers is necessary to add multiple featues and organize the t shirt design. Depending on the complexity of your design you can add countless layers on one section. This helps each design element be individually edited and moved.
New Layer: Cmd + Shift + Alt + N
New Layer with a dialog box: Cmd + Shift + N
Group Layers
Grouping layers in your t shirt design can help organize composition as well as arranging color seperations. If your t shirt design needs to be color separated to be screen print ready, placing your layers in named groups can be a great way to stay organized. Using different groups or layers for each screen printed color can save a lot of hassle when it comes to printing the final design.
To Group Layers select the layers in your design that you want to group together by pressing ( Cmd + click). Then press (Cmd + G) to make a group of layers
Create New Layer Containing all Layers
You can create a duplicate layer with all your layers flattened as one
New layer containing all layers:Cmd + Alt + Shift + E
Merging Layers - Working with a lot of layers in your design can increase document size. To do decrease the amounts of layers and document size merge two or more layers together.
Merge Layers: Cmd + E
Zoom In and Out - Working with detailed designs or larger designs can cause you to constantly be zooming in and out of certain areas.
Zoom In: Cmd + = Zoom Out: Cmd + -
A useful zoom trick is to fit your design to your monitor size.
Zoom Fit: Cmd + 0
Using Actions to Save Time in Repetitive Processes
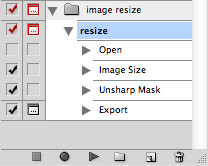
The Action tool could be one of the most useful tools for saving design time in Photoshop. An action can save you many steps especially if you are repetitive with certain design elements. It allows you to record steps that you use in one area, and then you can repeat the action in different places. For Example if you have 10 files to resize, sharpen, add a curve, and save for web. You can record those steps on one file and apply them to automatically run on all the files.
Now lets take a look at some of the actions that are available in Photoshop. Load the Actions by clicking on Window then Actions. This will give a list of options which you can select one to add effects to your design or even select the size of your canvas. There are tons of actions that are already loaded, and you can edit them as you see fit or you can create and record custom actions.
You can make a new action by clicking the New Action Icon located on the bottom of the palette. From that point, it starts recording each click that you do until you press the stop button. Then those actions will be saved, and all you need to do is press the play button on the next file and your action will do all the work for you.
Switch Documents - A lot of times we need to be switching back and forth between documents if we need certain elements.
Switch Documents: Cmd + Tab
The Move Tool - Working with detailed and large design that you need to zoom in on, the Move tool can be helpful. Â Toggle move tool by holding down Spacebar or switch to the Move tool by pressing H.
Move Tool: H Then click and hold space bar to navigate throughout the canvas
Rotate View: Rotate view by pressing R. This will rotate the canvas toward different angles.
Show / Hide Rulers and Guides Using the rulers and guides can be very useful to making your artwork very detailed as far as placement and lines go.
Toggle Ruler: Cmd + R
Toggle Guides: Cmd +
Please comment with any other shortcuts you find valuble in designing a T Shirt